
Tankless water heaters need annual descaling, not a tank flush. Here's the real procedure, hardness-based intervals, filter care, and 2026 costs.
Key takeaways
- Descale annually with moderate water hardness; every 6 months once your water is genuinely hard, per Rheem's own guidance.
- There's no tank to sediment-flush—mineral scale instead coats the heat exchanger and can trigger error codes.
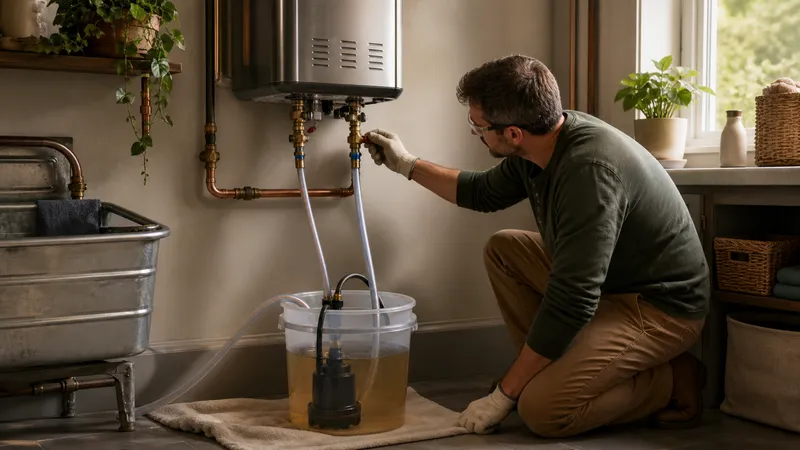
- The real procedure: isolate at the service valves, circulate a vinegar or descaling solution with a pump, then rinse clean.
- Clean the inline inlet filter/screen separately and more often than the annual descaling—Rinnai and Rheem both call it out on its own.
- Condensing models add a condensate drain and neutralizer; non-condensing models don't—check which you have before you skip that step.
- 2026 costs: a DIY descaling kit runs $20–$100; professional descaling service runs $150–$350, per Angi.
A tankless water heater needs an annual descaling, not a tank flush—circulating a vinegar or commercial descaling solution through the heat exchanger to dissolve mineral scale, using the unit’s dedicated service valves. Most households can do this once a year; genuinely hard water pushes that to every 6 months, per Rheem’s own tankless maintenance guidance. The general water heater service guide covers this in a couple of sentences next to the tank-flush procedure. This page is the deep dive: why tankless units scale instead of silt up, the actual descaling steps, the separate filter-cleaning task, venting and condensate specifics, and 2026 costs.
Why tankless units scale instead of silt up
A tank water heater holds 30–80 gallons of standing water. Minerals settle out of that water and collect as sediment at the bottom of the tank, which is what a tank flush clears out.
A tankless unit doesn’t hold standing water the same way—water passes through a compact heat exchanger only while a tap is open. There’s no pool at the bottom to sediment-flush. Instead, the minerals in that flowing water (mostly calcium and magnesium in hard water) deposit as scale on the inside walls of the heat exchanger itself. Rheem’s maintenance guidance describes this directly: hard water leaves behind “calcium and magnesium deposits that reduce efficiency,” and the fix is a “vinegar or descaling solution flush” through the unit rather than a drain-and-refill (Rheem: Keeping Your Water Heater at Its Best — Tankless Edition).
That scale layer does two things a homeowner actually notices. First, it insulates the heat exchanger from the water it’s supposed to be heating, so the unit works harder and burns more gas or electricity to hit your set temperature. Second, once scale builds up enough to restrict flow or overheat a section of the exchanger, many units respond with an error code or a shutdown rather than silently running worse—Rinnai’s own support guidance for its units describes mineral buildup as something that “can erode the walls inside your tank’s heating chamber” over time if it isn’t cleared (Rinnai residential FAQ). A unit that’s throwing a flow- or temperature-related error code after a year or more without descaling is very often telling you it’s overdue, not failing outright.
Descaling frequency by water hardness
| Water hardness | Typical descaling interval | Source |
|---|---|---|
| Moderate (most municipal supplies) | Once a year | Rheem tankless maintenance guide |
| Hard (well water, high mineral content) | Every 6 months | Rheem tankless maintenance guide |
| Any hardness, per Rinnai | At least once a year, more often as hardness increases | Rinnai residential FAQ |
Both manufacturers land on the same shape: annual as the floor, every 6 months once the water is genuinely hard. If you don’t know your water hardness, a home test strip (sold alongside water-softener supplies) or your municipal water quality report will tell you. Your own unit’s manual is the final word if it specifies a different interval—Rheem and Rinnai are real examples here, not a universal standard.
How to descale a tankless water heater
This is a sequential procedure—work through it in order.
- Shut off power or gas to the unit at the breaker (electric) or the gas control (gas), per your manual.
- Close the hot and cold isolation (service) valves. Most tankless units have a dedicated pair of these valves built into the unit specifically for descaling—look for two valves with small hose-bib style ports near the water connections.
- Connect a submersible pump to the cold-side service valve using the hose ports, with the pump and its hose sitting in a clean bucket.
- Connect a second hose from the hot-side service valve back into the same bucket, so the solution circulates in a closed loop through the unit and back to the bucket.
- Fill the bucket with food-grade white vinegar or a commercial tankless descaling solution—enough to fully submerge the pump and keep the loop full while running.
- Open both service valves to let the solution enter the unit, then run the pump to circulate the solution through the heat exchanger and back to the bucket.
- Let the solution circulate. Manufacturer and commercial descaling-kit instructions commonly call for roughly 45 minutes to an hour of circulation to dissolve scale—treat this as a starting point and follow your own kit’s or manual’s stated time, since it varies by product concentration and scale buildup.
- Turn off the pump, close the service valves, disconnect the hoses, and dispose of the used solution (diluted vinegar is fine down a drain; check the label for commercial solutions).
- Flush with clean water through the same service-valve connections for a few minutes to clear any remaining solution before restoring supply.
- Reopen the main hot and cold supply valves, restore power or gas, and run a hot tap to confirm normal flow and temperature before considering the job done.
Rinnai documents a comparable process—isolating the unit at its service valves, circulating a descaling solution with a pump—as part of its own maintenance guidance, while noting that many owners prefer to have a licensed installer handle the full procedure the first time (Rinnai residential FAQ). Doing it yourself is reasonable once you’ve watched or performed it once; the valves exist so this doesn’t require opening a sealed gas or electrical section of the unit.
Inlet filter and screen cleaning: a separate, more frequent job
Most tankless units have an inline inlet water filter or screen ahead of the heat exchanger, and it’s a different task from descaling on a different schedule. Rinnai’s guidance describes removing and rinsing this screen under running water, with its own short cleaning process independent of the full descaling procedure (Rinnai residential FAQ). Rheem’s guidance folds filter cleaning into the annual service visit but flags that homes with visible sediment or mineral particles in the water supply need it more often (Rheem tankless maintenance guide).
A practical homeowner rule of thumb: check the inlet screen every 3–6 months in your first year to see how fast it actually collects debris in your house, then set your own interval from what you find rather than assuming an annual check is enough. A clogged inlet screen restricts flow and can mimic a scaling problem—confirm the screen is clean before assuming a unit needs a full descale.
Venting and condensate: the part the tank guide doesn’t cover
Tankless units split into two venting types, and it changes what you need to check.
| Unit type | Vent material | What to check | Condensate |
|---|---|---|---|
| Non-condensing | Stainless steel vent, higher flue temperature | Intake and exhaust vent terminals clear of debris, snow, pests | None—no condensate drain |
| Condensing | PVC/CPVC vent, lower flue temperature (heat is recovered from exhaust) | Same vent-terminal check, plus the condensate drain line and neutralizer | Acidic condensate must drain freely and pass through a neutralizer before disposal |
Rheem’s own guidance is specific on both counts: keep the intake and exhaust vents “clear of dirt, debris, snow, or pests” since “proper airflow is critical for safe combustion and efficient operation,” and on condensing models, “inspect the neutralizer, media, and housing,” replacing or refilling the media once it’s saturated or worn so “acidic condensate is properly treated before draining” (Rheem tankless maintenance guide). A condensate line that’s clogged or a neutralizer that’s exhausted is a common cause of nuisance shutdowns on condensing units that homeowners often mistake for a scaling problem—check both before assuming the heat exchanger itself is the issue.
2026 cost: DIY descaling kit vs. professional service
| Option | 2026 cost | What’s included | Source |
|---|---|---|---|
| DIY descaling kit | $20–$100 | Pump (if not already owned), hoses, descaling solution | Angi tankless water heater repair cost data |
| Professional descaling service | $150–$350 | Labor plus solution; often bundled with a filter check and vent inspection | Angi tankless water heater repair cost data |
| Annual maintenance plan | $100–$300/year | Recurring inspection, descaling, and filter cleaning bundled by a plumbing company | Angi tankless water heater repair cost data |
A pump you already own (or a reusable one bought once) drops the marginal cost of each future DIY descaling to just the solution—a few dollars in vinegar or a $15–$25 refill of commercial descaler. Regional labor rates and whether a technician finds anything beyond routine scale (a stuck valve, a saturated neutralizer) move the professional number in either direction.
When to call a professional
| Situation | Why it is not DIY |
|---|---|
| Error code tied to ignition, gas valve, or heat exchanger temperature after descaling | Combustion and heat-exchanger diagnostics require gas-safe tools and training |
| Isolation/service valve leaks or won’t close fully | A valve that can’t isolate the unit makes descaling unsafe to attempt yourself |
| Vent terminal, vent pipe damage, or a condensing unit’s exhaust showing corrosion | Venting affects combustion safety and CO risk; not a DIY repair |
| Gas smell, soot, or a yellow/orange burner flame | Emergency: leave, call your gas utility or 911, then a technician |
| Condensate neutralizer media needs replacement and you’re unsure of the part | Wrong media can let acidic condensate damage the drain line over time |
| First-ever descaling on a unit you didn’t install | A technician can confirm your service valves, water hardness, and manual match before you take over the annual task yourself |
A photo of the unit’s label and error display, plus a booked appointment, is often the right move here—that’s not a failure to DIY it.
Related guides
Frequently asked questions
How often should you descale a tankless water heater?
At least once a year for most households. With genuinely hard water, plan on every 6 months—Rheem’s own maintenance guidance calls out that interval for mineral-rich water areas. Your model’s manual overrides both if it specifies something different.
Do tankless water heaters need an anode rod?
No. Anode rods protect the steel lining of a storage tank from corrosion. Tankless units don’t hold standing water in a tank, so there’s nothing for an anode rod to protect—skip that line item entirely.
Can you descale a tankless water heater yourself?
Yes, in most cases. Manufacturers build dedicated hot and cold service (isolation) valves into tankless units specifically so a homeowner or technician can circulate a descaling solution without touching gas or electrical connections. Gas, venting, or error-code diagnosis is where DIY should stop.
What’s the difference between descaling and flushing a water heater?
Flushing (tank units) drains standing water to clear sediment that settles at the bottom of a tank. Descaling (tankless units) circulates a solution through the heat exchanger to dissolve mineral scale, since a tankless unit never holds enough standing water to build a sediment layer.