
Most manuals call for every 6 months, more often with pets. Here's the interval, how to find your coils, and the safe cleaning steps.
Key takeaways
- Whirlpool's guidance: clean condenser coils every 3 to 6 months with pets, dust, or heavy kitchen traffic.
- PNNL's Building America program puts the general interval at every 6 to 12 months for most households.
- Unplug the fridge first. Use a coil brush or vacuum brush attachment—never water on the coils.
- Never bend the fins. Bent fins block airflow instead of restoring it.
- Buzzing, warm cabinet sides, longer run times, or ice on the back coil mean coils are overdue now.
- Some models built since roughly 2001 use a sealed condenser that does not need cleaning—check your manual first.
The fridge maintenance schedule covers the whole appliance; this page is the coil-cleaning deep dive it points to.
Most manufacturers call for cleaning refrigerator condenser coils every 6 months, or every 3 to 6 months if you have pets, heavy kitchen traffic, or a dusty environment—straight from Whirlpool’s product guidance. Dust-covered coils can’t shed heat as efficiently, so the compressor runs longer to hit the same temperature—the Building America Solution Center, a U.S. Department of Energy–backed program at Pacific Northwest National Laboratory, puts the general interval at every 6 to 12 months and ties it directly to efficiency, performance, and lifespan. Your model’s manual wins if it gives a different number.
How often to clean refrigerator coils
| Household situation | Interval | Source or rule of thumb |
|---|---|---|
| No pets, low dust, normal kitchen use | Inspect at 6–12 months; clean if visibly dusty | Whirlpool: routine cleaning often isn’t needed in a normal home |
| Pets that shed, heavy kitchen traffic, or construction dust | Every 3–6 months | Whirlpool product guidance |
| General households, as a default cadence | Every 6–12 months | PNNL Building America Solution Center |
| Sealed/“NeverClean” condenser (many models 2001 and newer) | Check manual—may not need cleaning at all | GE Appliances |
How to find your coils
Location depends on the model, and this is the detail most homeowners skip:
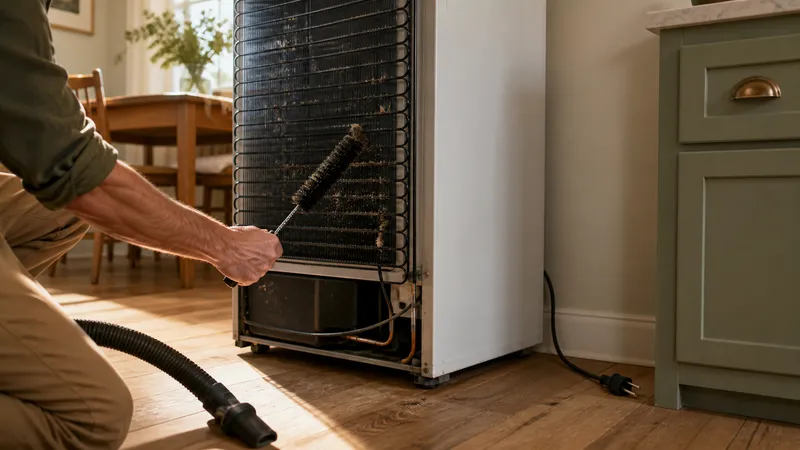
- Back-mounted coils (many older units and some current bottom-freezer models): pull the fridge away from the wall to reach a black grid on the back panel.
- Bottom-front-grille coils (most current models): the coils sit behind the kick plate/grille at the floor, reached by removing that panel rather than moving the fridge.
GE’s instructions describe both layouts and note that many refrigerators built since roughly 2001 use a sealed “NeverClean” condenser that doesn’t require cleaning at all—another reason to check the manual before you pull anything apart.
Cleaning steps
- Unplug the refrigerator. Don’t work around the compressor or coils while it’s powered.
- Expose the coils. Pull the unit away from the wall, or remove the bottom front grille/kick plate, depending on your model.
- Vacuum first. Use a vacuum with a crevice or brush attachment to pull off the bulk of the dust and pet hair.
- Brush the fins. Run a long, soft-bristle coil brush (Whirlpool part 4210463RW or GE part PM14X51 are examples of the dedicated tool) along the fins to loosen what the vacuum missed, then vacuum again.
- Sweep the floor under and behind the unit before pushing the fridge back or replacing the grille.
- Plug it back in and confirm it starts and runs normally.
| Tool | Use it for | Skip |
|---|---|---|
| Vacuum with brush/crevice attachment | Bulk dust and pet hair removal | A regular vacuum wand without a soft brush head |
| Long soft-bristle coil brush | Fins and gaps a vacuum can’t reach | Stiff-bristle or wire brushes |
| Dry cloth on the exterior grille only | Wiping visible dust off the housing | A damp or wet cloth directly on the coils |
Signs coils are overdue right now
Don’t wait for the calendar if you see these:
| Sign | What it usually means |
|---|---|
| Buzzing or humming louder than usual | Compressor working harder against blocked airflow |
| Warm or hot cabinet sides | Heat that should vent through the coils is staying in the unit |
| Refrigerator running longer or more often | Compressor cycling more to hold temperature |
| Ice building up on the back coil | Airflow restriction, sometimes paired with a door-seal or defrost issue |
These are homeowner tells, not a manufacturer diagnostic code—if cleaning the coils doesn’t fix a running or ice problem within a day or two, treat it as a separate issue.
When to call a professional
| Situation | Why it is not DIY |
|---|---|
| Compressor won’t restart after cleaning and unplugging | Electrical or component failure, not an airflow problem |
| Any refrigerant smell or hissing near the compressor | Sealed system issue—refrigerant work requires an EPA-certified technician |
| Exposed or damaged wiring near the compressor compartment | Shock risk |
| Ice or moisture problems that continue after clean coils | Likely a door seal, defrost heater, or control board issue outside coil cleaning |
Related guides
Frequently asked questions
How often should you clean refrigerator coils?
Whirlpool’s product guidance calls for cleaning every 3 to 6 months if you have pets, heavy kitchen traffic, or dust, and says routine cleaning usually isn’t needed otherwise in a normal home. PNNL’s Building America Solution Center gives a general range of every 6 to 12 months for most households. Your model’s manual overrides both if it gives a specific interval.
Can I clean refrigerator coils with water?
No. Manufacturer instructions from Whirlpool and GE call for a soft-bristle coil brush or a vacuum with a brush attachment, not water, since the coils sit near electrical and motor components.
Where are the condenser coils on a refrigerator?
Older and some current models mount coils on the back of the cabinet, reached by pulling the fridge away from the wall. Most current models put them behind a grille at the bottom front, reached by removing the kick plate. Check your model’s Use and Care Guide for the exact location.
What are the signs refrigerator coils need cleaning?
A refrigerator that buzzes or hums more than usual, feels warm along the outer cabinet sides, runs longer or more often than it used to, or shows ice buildup on the back coil is a sign the coils are overdue for cleaning.